|
Knee pain can come on suddenly: a sideways blow in athletics or a nasty fall while stepping off a curb. But many knee issues creep up after years of poor alignment, which results in wear and tear and arthritis. No matter the cause, knee issues do not often exist in isolation. In other words, a "cranky" knee will often have an un-neighborly relationship with the ankle below it, and/or the hip above it. Whatever detonated your knee pain, the tissues above and below the knee must be nurtured, strengthened and given some "KneeHab" in order for the knee to learn some new strategies for pain-free living. And don't forget the other knee, hip and ankle on the non-injured side, as it will also develop its own issues too from being "leaned on" so often. These compensation attempts inevitably lead to low back pain, neck and shoulder pain—and more yuck. My Yoga Tune Up® Quick Fix Rx: KneeHab DVD ($19.95) provides solutions whether your knee is wonky from sports, you're recovering from meniscus surgery or you are just looking to prevent knee injury. It will show you how to help manage just about every stage of knee dysfunction and maintenance. Here are five Yoga Tune Up® moves from my DVD to keep your knees happy, healthy and pain free! 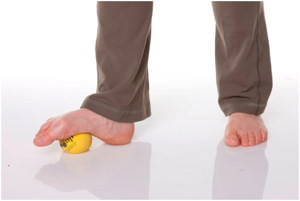 Playing Footsie Playing Footsie
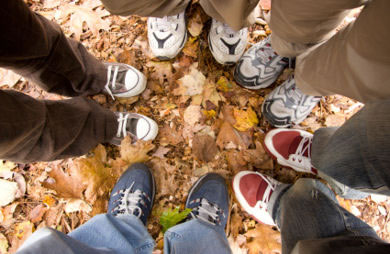
The feet and ankles contain 25% of the body's bones. Keeping the architecture of the feet strong, supple and responsive can make all the difference in the world for a knee that lives above this complex structure. Feet that are full of locked up joints, weakened musculature and collapsed arches create a faulty tread. The knee will pay the price for a rickety foundation "downstairs." 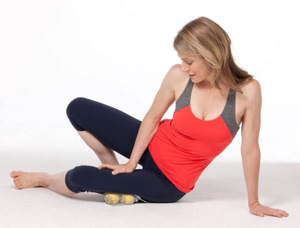 Iliotibial Band Savior Iliotibial Band Savior
The IT Band is often unreasonably tight with any type of knee dysfunction. This thickened sheath on the side of the quadriceps is a massive band of connective tissue is in direct continuity with the hips, buttocks low back, and the lower leg bones. This connective tissue is also wrapping around portions of the quadriceps muscles that tend to be very imbalanced with knee dysfunction. Stroking the balls both along and against the lateral thigh can make a huge difference in relieving pain and improving muscle function of the quads. 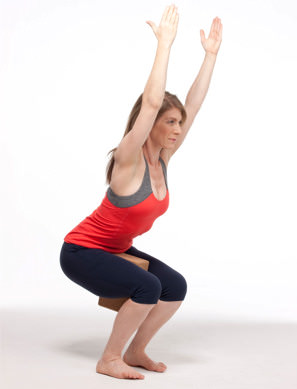 Chair Pose with a Block Chair Pose with a Block
Chair pose requires the entire body become strong and stable as it begins to squat. The block helps to remind the inner thighs to participate in stabilizing the knee during the entire move. Oftentimes weak inner thighs can be the culprit of knee pain. This pose demands that every stabilizing muscle surrounding the knee be used in full force. Additionally the abdominals, spine and shoulders participate recruiting the whole body as a source of empowerment for the knee. You will feel this tomorrow. Especially if you do five full rounds of 1-minute holds! 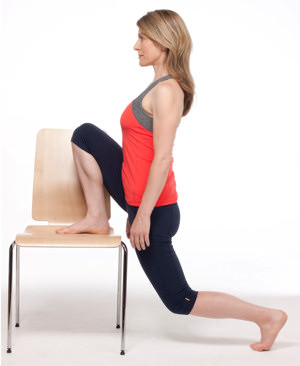 Runner's Lunge Redo Runner's Lunge Redo
Why you KNEED to do this: This pose demands that the hip flexors strengthen as they lengthen. This also promotes deep elongation of the iliopsoas, a deep postural muscle that will often go into spasm because of a faulty knee. Notice how both feet are parallel? This pose also helps to track the hips in a more neutral, less "duck walk" position for walking, running and standing. 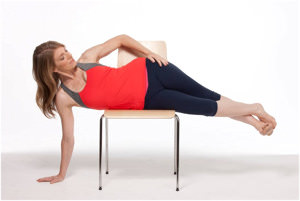 IT Band Meltdown IT Band Meltdown
This pose lengthens the low back, side of hip and the ever-famous IT Band. It stretches the lateral gluteal muscles (gluteus medius and minimus), which can become riddled with knots and trigger points due to compensations for knee pain. The lateral hip capsule is mobilized and synovial fluid can coat into portions of the hip that may be a bit dry from lack of mobility. By adding the resistance, you will not only stretch these tissues, but will strengthen them within a lengthened position which will lead to more fluidity of motion in the hip. In addition to these five therapeutic moves, here are my three best tips and long-term strategies to prevent knee pain:
 About Jill Miller About Jill MillerJill Miller is a yoga/fitness therapy expert. She instructs her original Yoga Tune Up® format worldwide and has produced over 55 critically acclaimed videos and therapeutic fitness products. Her innovative format is taught nationwide at Equinox gyms and has been featured on the "Today" show, ABC TV, FOX TV, SELF magazine, Shape, Fitness, Redbook, Prevention, Real Simple, Yoga Journal, Chatelaine, Whole Living, Muscle & Fitness, Gaiam.com and more. She is based in Los Angeles, CA. |
Popular Entries
Related Entries
More From SparkPeople
|


