
It's summer, and that means fruit trees, bushes, and berry plants are exploding with a bountiful harvest. A healthy goal is to eat a variety of these local and fresh fruits. If we fast forward to fall, the taste of sweet, juicy strawberries are all but gone. Never fear! With local produce at its peak, think like the animals--harvest and store for winter. When it comes to fruit, you have three options: can, freeze, or dry. Learn how to turn summer's freshest fruit into a snack you can enjoy year-round. It's like nature's candy, and it requires no special equipment. While you could use a dehydrator or old-fashioned drying cabinet, you don't need one. All you need is an oven, parchment paper or silicone liners and sheet pans or pizza screens if you have them. The method is quite simple. You're simply heating the fruit at a low temperature to allow enough water to evaporate so the chance of bacterial growth is minimized. How to Dry Your Own Fruits Prep your fruit Choose ripe or just overly ripe fruits and berries Wash in cold water Remove any blemishes Remove any pits or stones from stone fruits Remove any stems from berries Cut and slice fruits evenly so that they will dry within the same time frame (Optional) Remove the skins Some fruits, such as peaches, nectarines, and apples, dry better if the skin has been removed. Score the bottom of each piece of fruit by making a shallow "x" with a paring knife. Bunk into boiling water for 30 seconds, then transfer to a basin filled with ice water. The skins should slip right off. Soak it To keep fruit looking pretty and minimize discoloration, soak it in lemon juice and water. Soak fruit for 10 minutes, drain and blot dry with a lint-free towel. To the Oven Preheat the oven to 130-160 degrees F. Use a lower temperature for thin sliced fruits such as apples or peaches. Strawberries and other whole berries love the higher heat. Place parchment paper onto sheet pans. Arrange fruit in a single layer, and do not allow pieces to touch. Top fruit with a pizza screen or silicone pan liner to keep them from curling up as they dry. Place fruit into the oven and rotate pans every 2 hours. How do you know if it's ready? Dried fruit should feel like leather but still be pliable. General Cooking Times (We've shared a convenient, pinnable graphic below!)
Cure it! When the fruit is ready, remove it from the oven and place in glass or plastic containers to "cure." Leave the container open for 4-5 days so that any moisture left from the drying process can evaporate. Shake the container every day or so to move the fruit around. Seal the containers after 5 days and enjoy dried fruits until next harvest season, about 10 months. Don't feel like you have to dry pieces of fruit or berries. Try making a DIY fruit strips. Simple Fruit Strip Recipe Note: Nutrition info will vary Combine 2 cups of chopped fruits and berries into a saucepan with 1 cup water, and cook over medium heat until fruit is soft. Remove from heat and let cool to room temperature. Puree the cooked fruit with 1 tablespoon honey and 1 teaspoon lemon juice. Spread onto a sheet pan lined with parchment paper. Dry at 140 degrees for 5-6 hours. If fruit feels sticky after 6 hours continue to dry an additional hour. Use kitchen shears to cut into desired shapes. Chef's tip: Save tomato skins As a chef, I hate to waste any foods. Tomato skins tend to be discarded, especially when you're canning tomatoes in summertime. Don't pitch them--dry them. Dried tomato skins are a perfect topping for appetizers like crostini, salads, and even pizza. You can even grind dried tomato skins and add to spice blends. Follow the steps above, making sure to cover with parchment paper or a pizza screen so that the skins will not curl up while drying. Bake at 150 degrees for 1-2 hours. Follow the "curing" instructions above. Chef's tip #2: Get the holiday spirit early It's never too early to get ready for the holidays. Dry slices of oranges for the holiday tree. Store in a sealed container until the holidays. 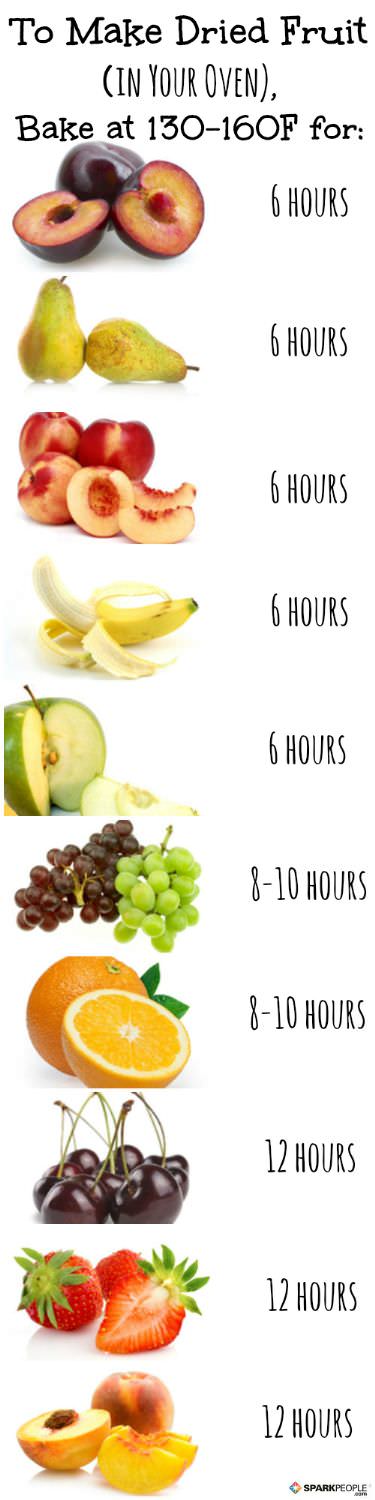
|
Popular EntriesMore From SparkPeople
|


.jpg)

.jpg)


